

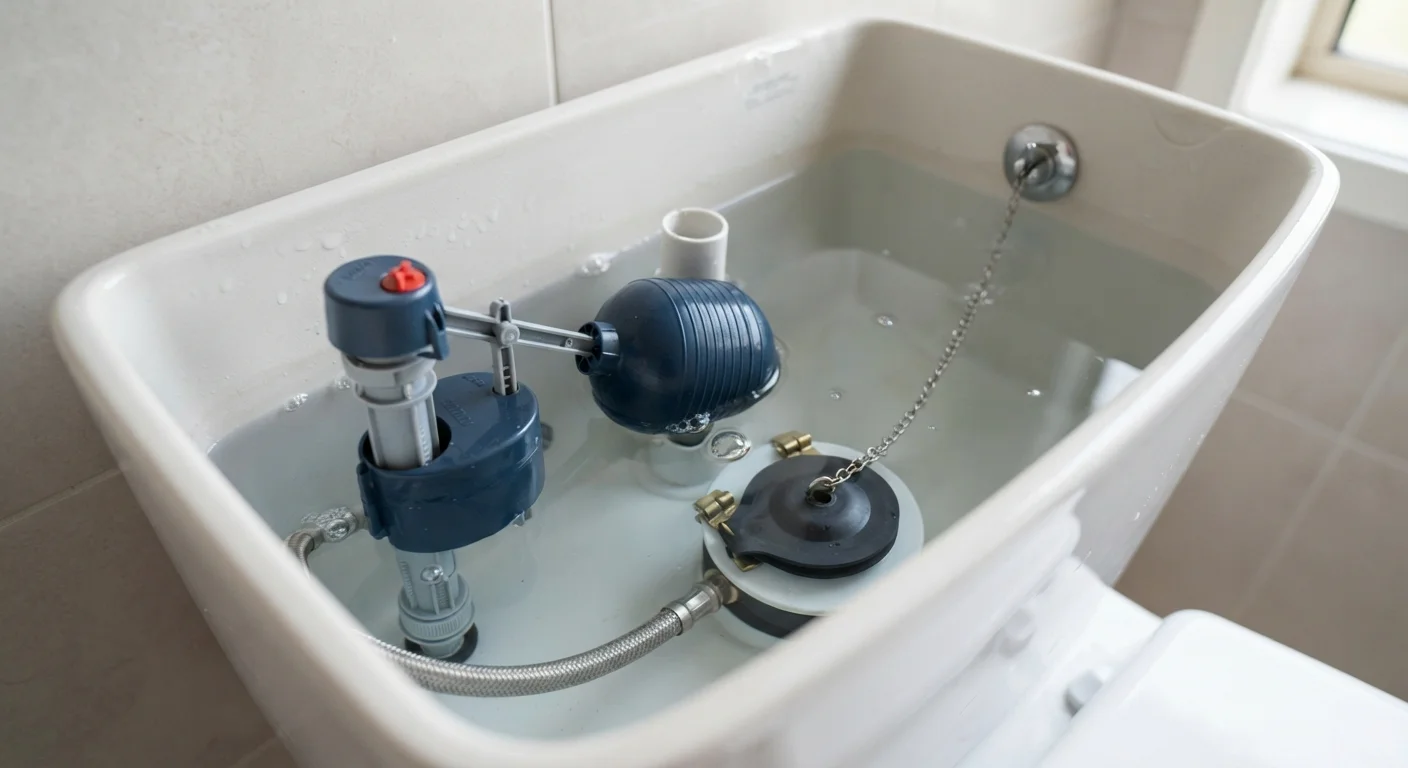
What's Going On Inside the Cistern
That constant hissing or trickling sound from your toilet isn't random — it means water is escaping from the cistern faster than it should, so the fill valve keeps topping it up. To fix it, you need to understand the three main players inside the tank.
- The flapper — a rubber seal that sits at the bottom of the cistern. After a flush, it drops back down to hold water in the tank. If the rubber degrades or warps, water leaks continuously into the bowl.
- The float — a ball or cup that rises with the water level and signals the fill valve to shut off when the tank is full. If the float is set too high, water spills into the overflow tube and never stops refilling.
- The fill valve — the tall mechanism connected to your supply line. It opens to refill the cistern and closes when the float tells it to stop. A worn valve may not seal properly.
These three parts work as a system. When something goes wrong, the toilet runs — and your water meter (or bill) quietly keeps climbing. Just like a dripping tap, a running toilet is easy to dismiss but worth addressing promptly.
Tools and Parts You May Need
Most cistern fixes need little more than dry hands and patience, but having the right items nearby prevents mid-job trips to the hardware store.
Adjustable pliers
Used to loosen or tighten the fill valve lock nut when replacing the valve.
Replacement flapper
Swaps out a degraded rubber seal at the bottom of the cistern to stop water leaking into the bowl.
Replacement fill valve
Replaces a worn or cracked fill valve that won't shut off reliably.
Dry cloth or paper towels
Keeps your hands dry for better grip and mops up any water around the cistern.
Before purchasing any replacement part, lift the cistern lid and note the make and model stamped inside — parts are not always universal.
Diagnosing and Fixing the Problem
Work through these steps in order. Many running toilets are resolved at step two or three without buying anything.
What you will need
Lift the lid and listen
Remove the cistern lid carefully — it's ceramic and heavy — and set it flat on the floor. Let the toilet run and simply watch. Within a minute you'll usually see one of three things: water trickling over the top of the overflow tube, the flapper visibly allowing a trickle into the bowl, or the fill valve running non-stop even with a full tank.
Check and adjust the float
If water is reaching the top of the overflow tube, the float is set too high. On a ball-float system, gently bend the metal arm downward so the ball sits lower and triggers shut-off sooner. On a cup-float system, pinch the clip on the side of the float and slide it down the fill valve shaft about half an inch. Flush and observe — the water should now stop an inch or two below the overflow tube rim.
Inspect and replace the flapper
Turn off the water supply using the shut-off valve (turn clockwise). Flush to empty the tank. Unhook the old flapper from the pegs on either side of the overflow tube and disconnect the chain from the flush handle arm. Take the old flapper to a hardware store to match the size, or use the model number from the cistern. Snap the new flapper onto the pegs, clip the chain so it has just a little slack, then restore the water supply and test.
Replace the fill valve if needed
If adjusting the float doesn't help and the fill valve hisses or runs regardless of water level, the valve itself may need replacing. Shut off the supply valve, flush to drain, then use pliers to remove the lock nut beneath the cistern. Lift the old valve out, insert the new one to the correct height (follow the manufacturer's markings), hand-tighten the lock nut, reconnect the supply line, and turn the water back on slowly. Adjust the float height on the new valve so the water stops at the correct level.
Know Your Rental Agreement Before You Start
In many rental agreements, tenants are not permitted to make plumbing repairs beyond basic adjustments — and doing so could affect your deposit or even your tenancy. If you're unsure, photograph the issue, report it in writing to your landlord, and ask before touching internal components. A float adjustment is generally low-risk; replacing a fill valve crosses into territory worth confirming first.
If you're renting, it's worth reviewing who is responsible for which repairs before spending money on parts. Minor adjustments are generally fine to handle yourself; replacing major components is sometimes better escalated to your landlord or property manager. For broader guidance on making that call, see our article on deciding when to DIY and when to wait.
The content provided on our blog site traverses numerous categories, offering readers valuable and practical information. Readers can use the editorial team’s research and data to gain more insights into their topics of interest. However, they are requested not to treat the articles as conclusive. The website team cannot be held responsible for differences in data or inaccuracies found across other platforms. Please also note that the site might also miss out on various schemes and offers available that the readers may find more beneficial than the ones we cover.